> ## Documentation Index
> Fetch the complete documentation index at: https://docs.mixroute.ai/llms.txt
> Use this file to discover all available pages before exploring further.
# OpenCode
> OpenCode 集成指南:通过 MixRoute 使用多模型编程助手
## 一、产品简介
OpenCode 是一款开源 AI 编程助手,支持 75+ 模型与本地部署。通过 **MixRoute**,可在 OpenCode 中统一使用各类主流与最新模型(如 GPT、Claude、Gemini 等),并支持自定义提供商与模型配置。
**下载地址**:[https://opencode.ai/](https://opencode.ai/)
## 二、快速配置(MixRoute)
### 1. 获取 API 密钥
在 [Mixroute Api 控制台](https://api.mixroute.ai/) 创建并复制 API 密钥。
### 2. 在 OpenCode 中配置自定义提供商
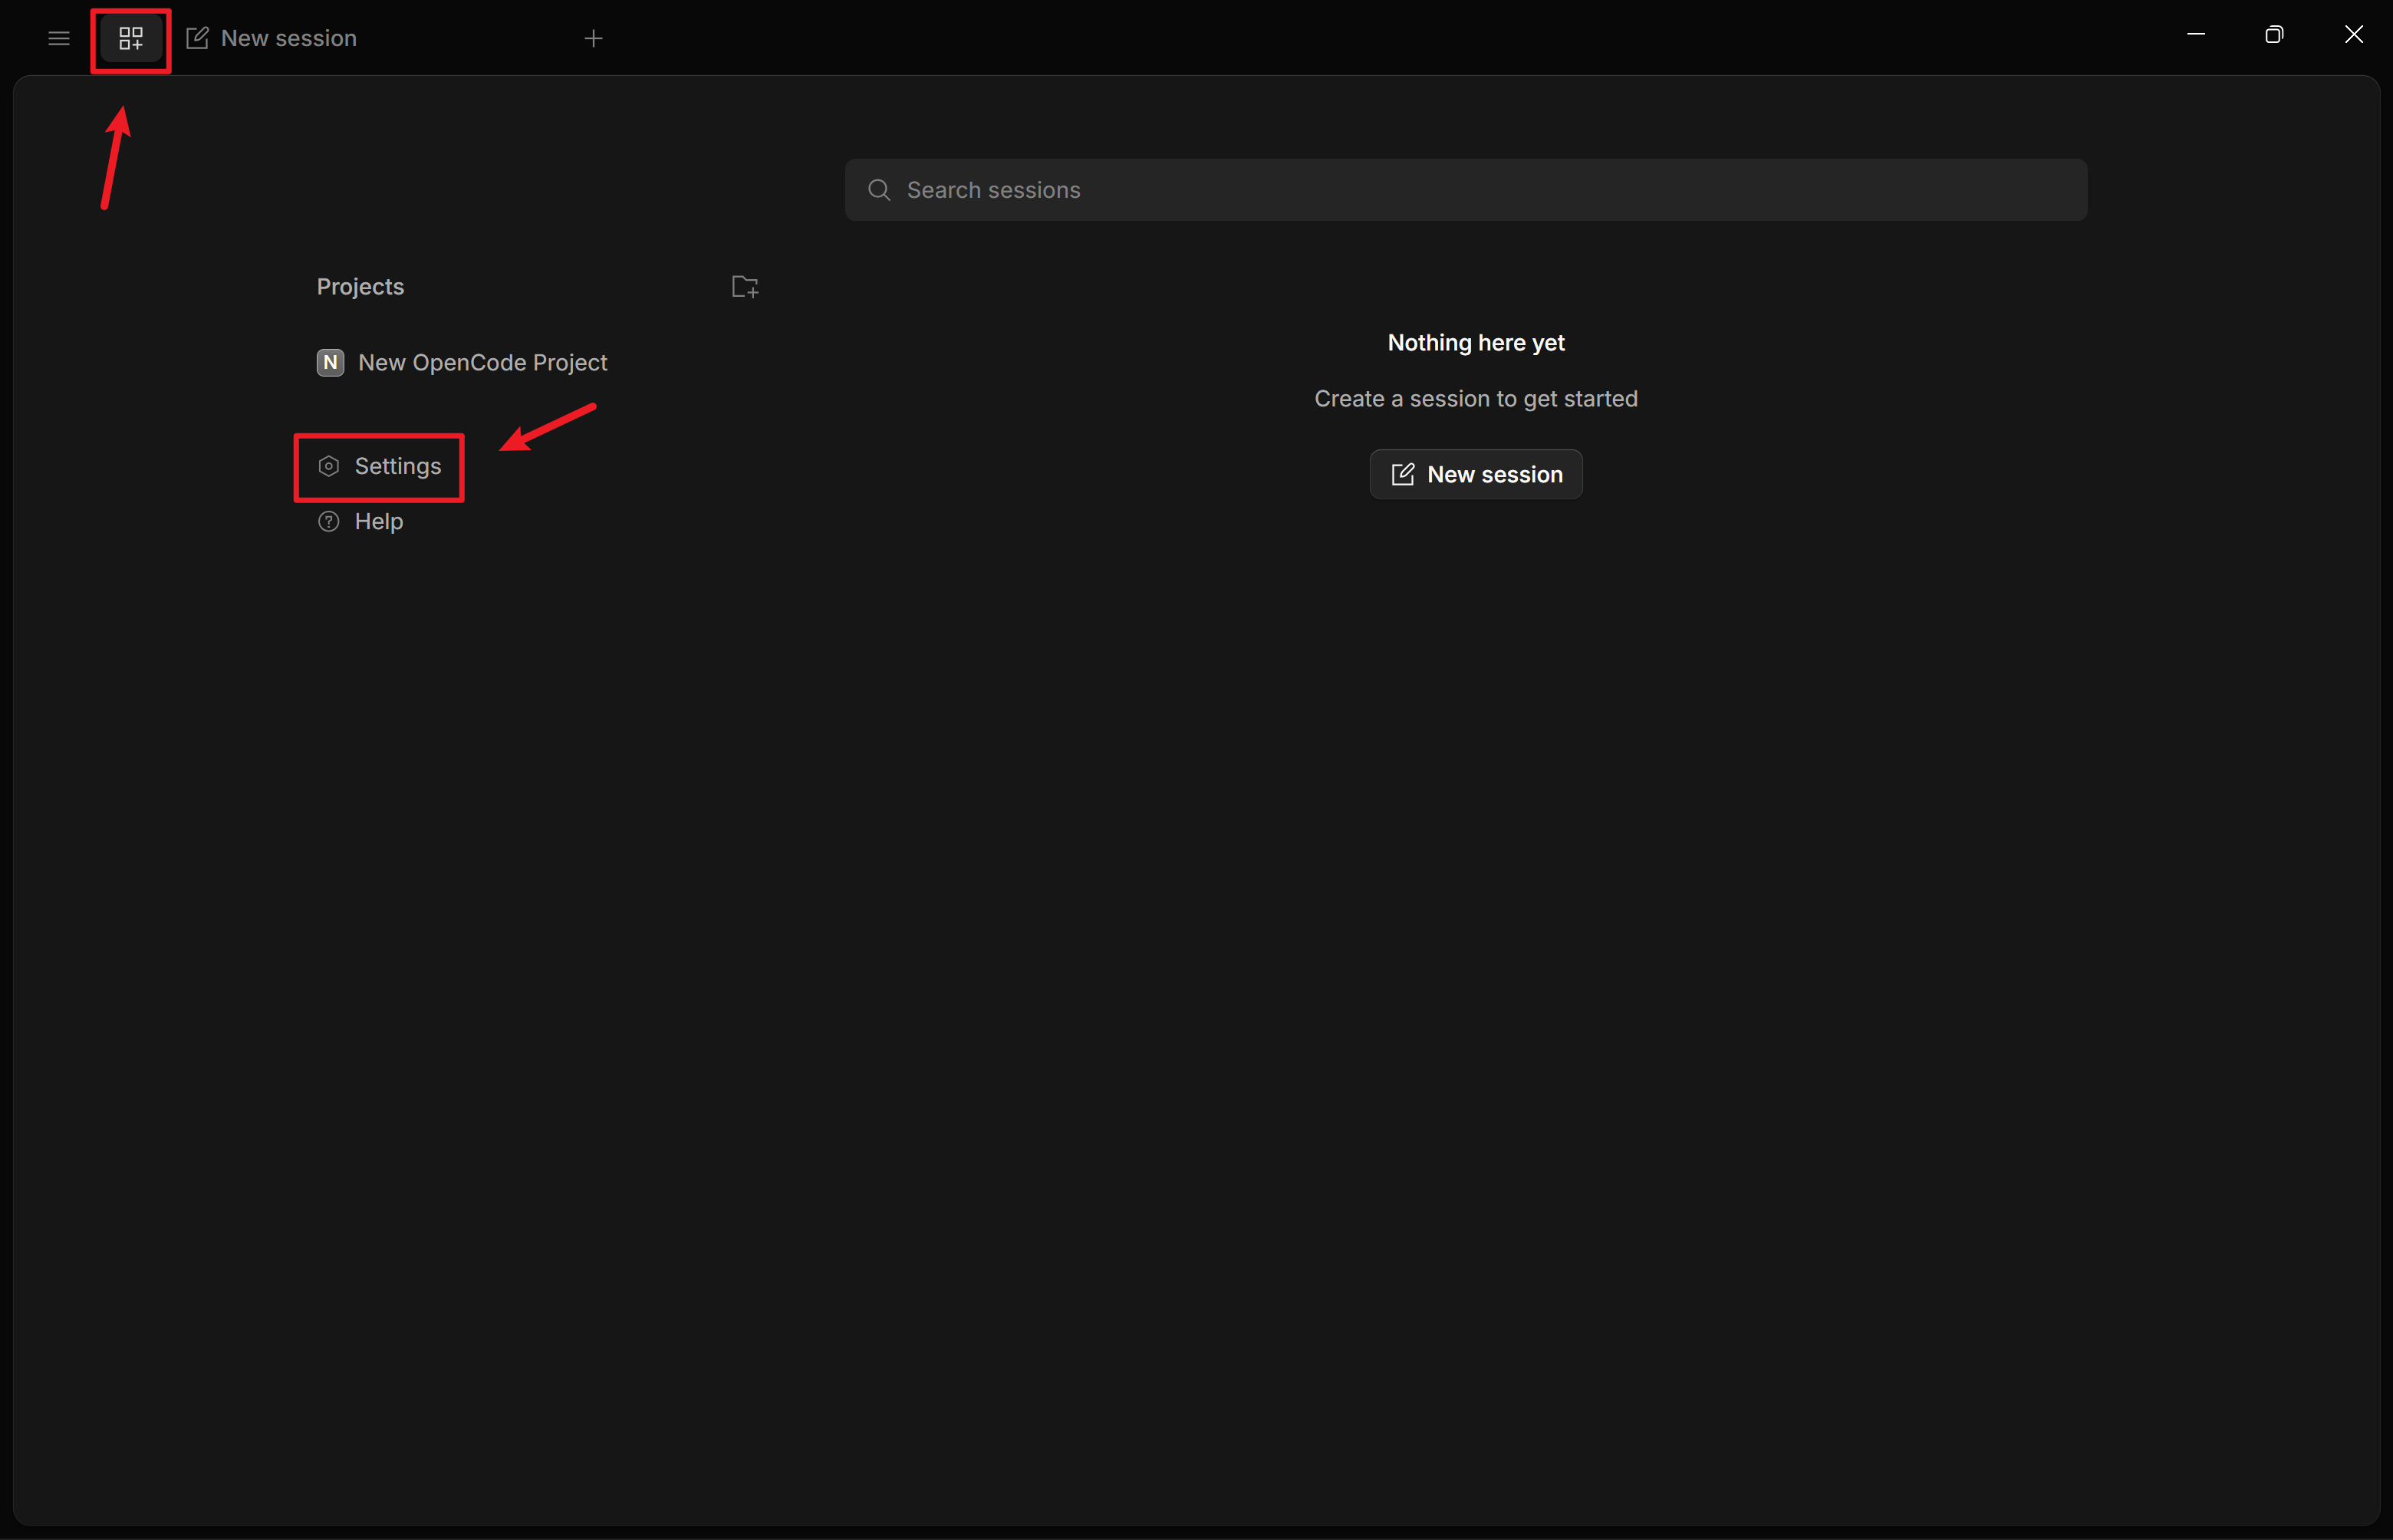
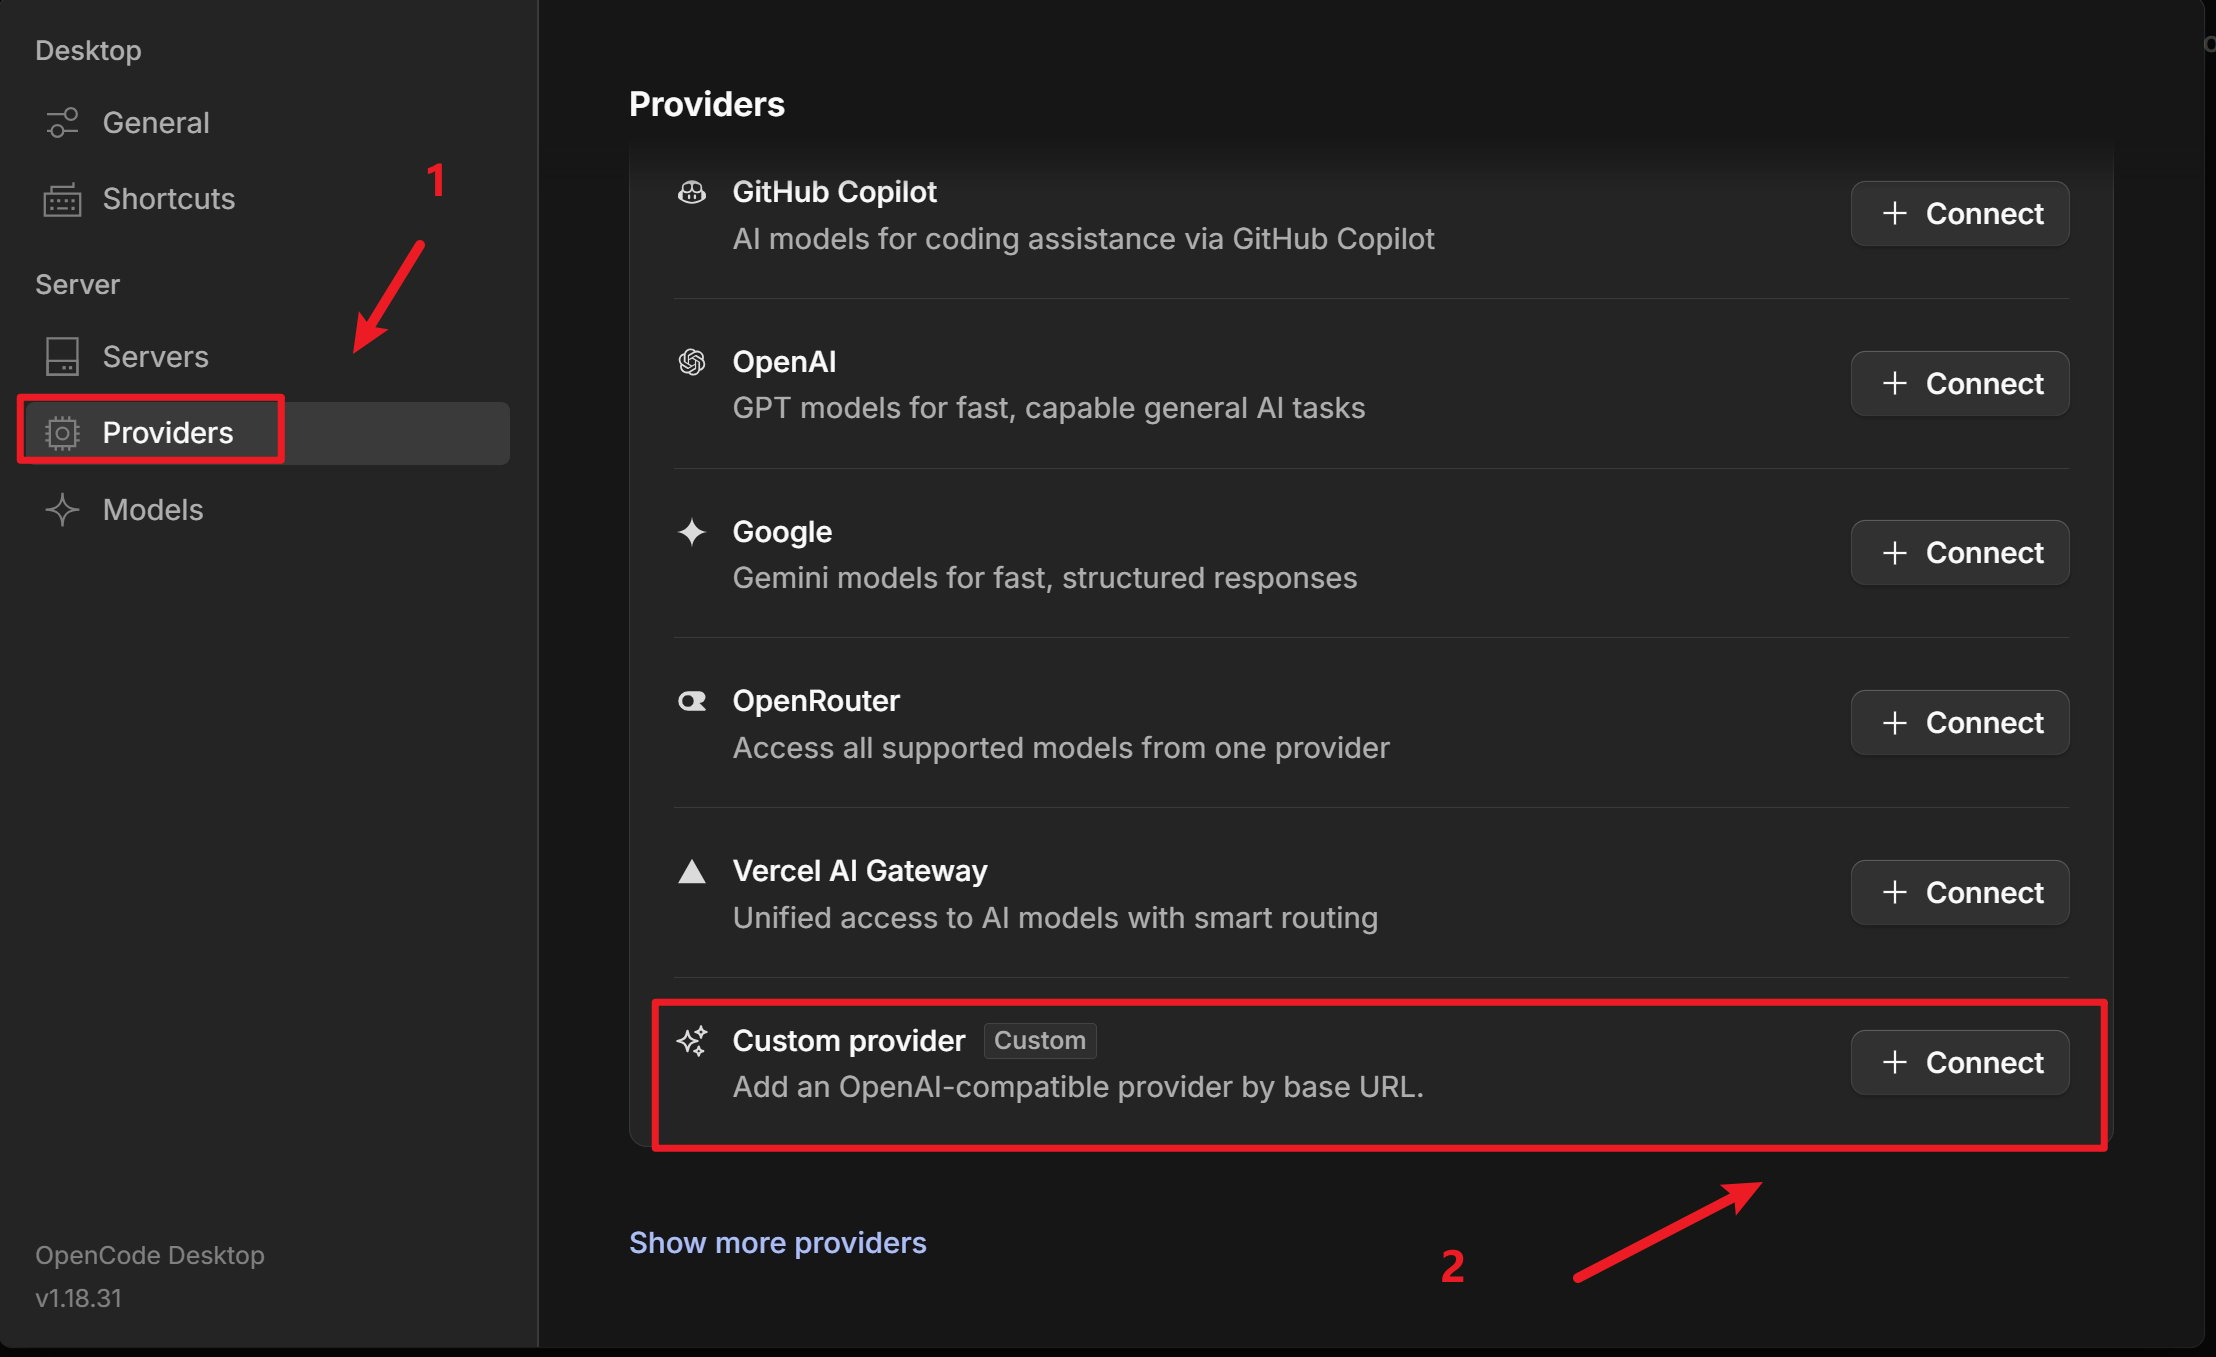
打开 OpenCode,进入 **服务器 / 提供商** 设置
 添加 **自定义提供商**(Configure an OpenAI compatible provider)
 [Smart Routing](https://console.mixroute.ai/smart-route) 是一项智能模型路由能力,能够根据输入任务的复杂程度,自动将请求分配至最合适的模型,最终起到降低API开销增强效率的目的。
约束和使用指南见[此处](/zh-hans/smart-routing)。
* **提供商 ID**:如 `mixroute-route`(小写、数字、连字符或下划线)
* **显示名称**:如 `Mixroute Api Route`
* **基础 URL**:`https://api.mixroute.ai/v1`(必须以 `/v1` 结尾)
* **API 密钥**:粘贴 Mixroute Api 智能路节点密钥
请注意智能路由节点的密钥是相对独立,不与传统API密钥共用
* **提供商 ID**:如 `mixroute`(小写、数字、连字符或下划线)
* **显示名称**:如 `Mixroute Api`
* **基础 URL**:`https://api.mixroute.ai/v1`(必须以 `/v1` 结尾)
* **API 密钥**:粘贴 Mixroute Api 密钥
在 **模型** 中添加需要使用的模型(如 `gpt-5.5`、`claude-opus-4-8` 等)
[Smart Routing](https://console.mixroute.ai/smart-route) 是一项智能模型路由能力,能够根据输入任务的复杂程度,自动将请求分配至最合适的模型,最终起到降低API开销增强效率的目的。
约束和使用指南见[此处](/zh-hans/smart-routing)。
* **提供商 ID**:如 `mixroute-route`(小写、数字、连字符或下划线)
* **显示名称**:如 `Mixroute Api Route`
* **基础 URL**:`https://api.mixroute.ai/v1`(必须以 `/v1` 结尾)
* **API 密钥**:粘贴 Mixroute Api 智能路节点密钥
请注意智能路由节点的密钥是相对独立,不与传统API密钥共用
* **提供商 ID**:如 `mixroute`(小写、数字、连字符或下划线)
* **显示名称**:如 `Mixroute Api`
* **基础 URL**:`https://api.mixroute.ai/v1`(必须以 `/v1` 结尾)
* **API 密钥**:粘贴 Mixroute Api 密钥
在 **模型** 中添加需要使用的模型(如 `gpt-5.5`、`claude-opus-4-8` 等)
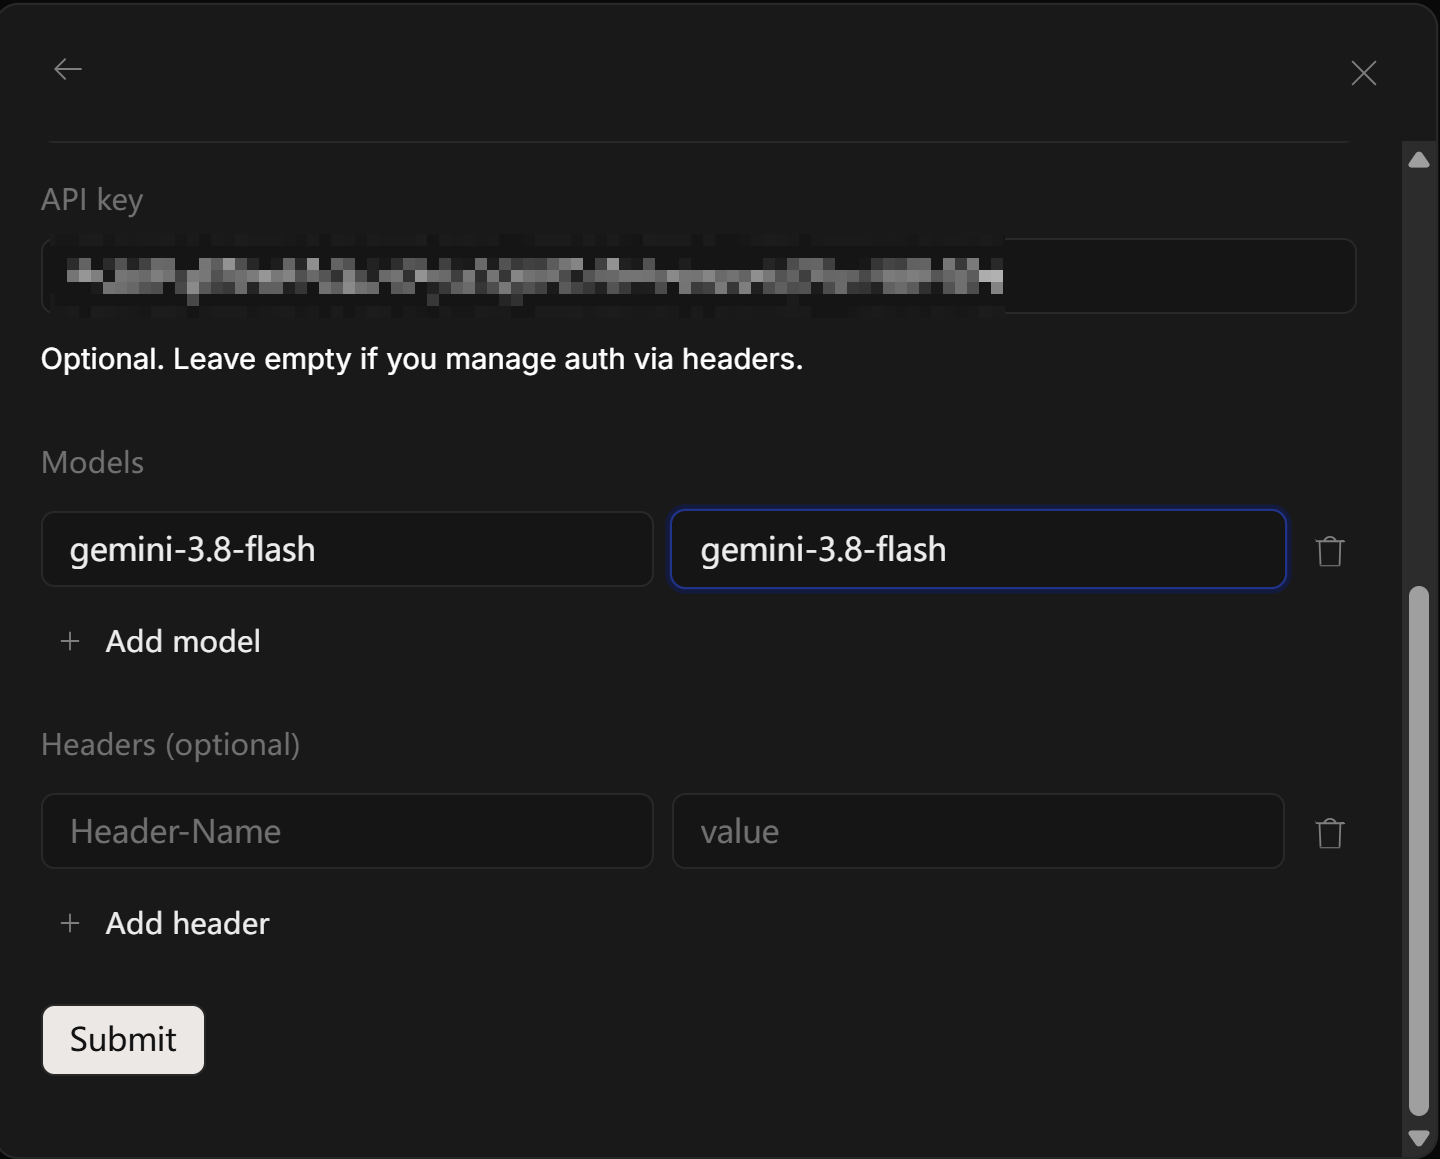 保存后,在模型选择中使用 **提供商ID/模型ID**(如 `mixroute/gpt-5.5`)
**具体配置信息**:
| 配置项 | 值 |
| - | - |
| 基础 URL | `https://api.mixroute.ai/v1` |
| API 密钥 | 在控制台获取(格式如 `sk-xxxxxxxxxxxxx`) |
| 模型 | 从模型列表选择并填入模型 ID |
### 3. 切换模型
在对话或设置中选择已配置的提供商与模型(如 `mixroute/gpt-5.5`)即可切换。
* 若使用自建或备用服务,将 **基础 URL** 改为对应地址,例如 `http://your-server:3003/v1`。
* 默认模型可在项目或全局 `opencode.json` 中设置 `"model": "mixroute/模型ID"`。
## 三、部分模型需使用 Responses API(重要)
部分模型的访问接口与常规 Chat Completions 不同,需使用 **Responses API**。若在 OpenCode 中选用这类模型时出现类似错误:
> The chatCompletion operation does not work with the specified model, **gpt-5.1-codex**. Please choose different model and try again.
说明当前请求走了 **Chat Completions**,而该模型在服务端只开放 **Responses API**,需通过配置改为使用正确接口。
### 3.1 需要走 Responses API 的模型(典型)
| 模型 ID / 系列 | 说明 |
| - | - |
| **gpt-5.1-codex** | GPT 5.1 Codex,编程/代码场景,仅支持 Responses API |
| **gpt-5.2-codex** | GPT 5.2 Codex,同上 |
| **gpt-5.3-codex** | GPT 5.2 Codex,同上 |
### 3.2 在 OpenCode 中如何配置
通过**在配置文件中配置额外的供应商使用 @ai-sdk/openai**,即可让 OpenCode 对该模型使用 **Responses API**。
**1. 找到配置文件**
* **Windows**:`C:\Users\<用户名>\.config\opencode\opencode.jsonc`
* **macOS / Linux**:`~/.config/opencode/opencode.jsonc`
**2. 在自定义提供商的模型配置中添加参数**
对需要走 Responses API 的模型做如下配置:
```jsonc theme={null}
{
"$schema": "https://opencode.ai/config.json",
"disabled_providers": [],
"provider": {
"mixroute": {
"name": "mixroute",
"npm": "@ai-sdk/openai-compatible",
"options": {
"baseURL": "https://api.mixroute.ai/v1"
},
"models": {
"gemini-3.8-flash": {
"name": "gemini-3.8-flash"
}
}
},
"mixroute-responses": {
"name": "mixroute-responses",
"npm": "@ai-sdk/openai",
"options": {
"baseURL": "https://api.mixroute.ai/v1",
"apiKey": "mixroute-key"
},
"models": {
"gpt-5.6-luna": {
"name": "gpt-5.6-luna"
},
"gpt-5.6-terra": {
"name": "gpt-5.6-terra"
},
"gpt-5.6-sol": {
"name": "gpt-5.6-sol"
}
}
}
}
}
```
保存后,在 OpenCode 中选择该提供商下的模型 (如 `mixroute/gpt-5.6-luna`),请求会以 **Responses API** 格式发往该 baseURL。
### 3.3 小结
| 场景 | 做法 |
| - | - |
| 使用 **gpt-5.1-codex / gpt-5.2-codex** 等仅支持 Responses 的模型 | 在 `opencode.jsonc` 中,添加独立的供应商以通过Responses的方式访问 |
| 使用 **gpt-5.5、claude-opus-4-8** 等常规模型 | 无需修改,按上文「快速配置」使用即可 |
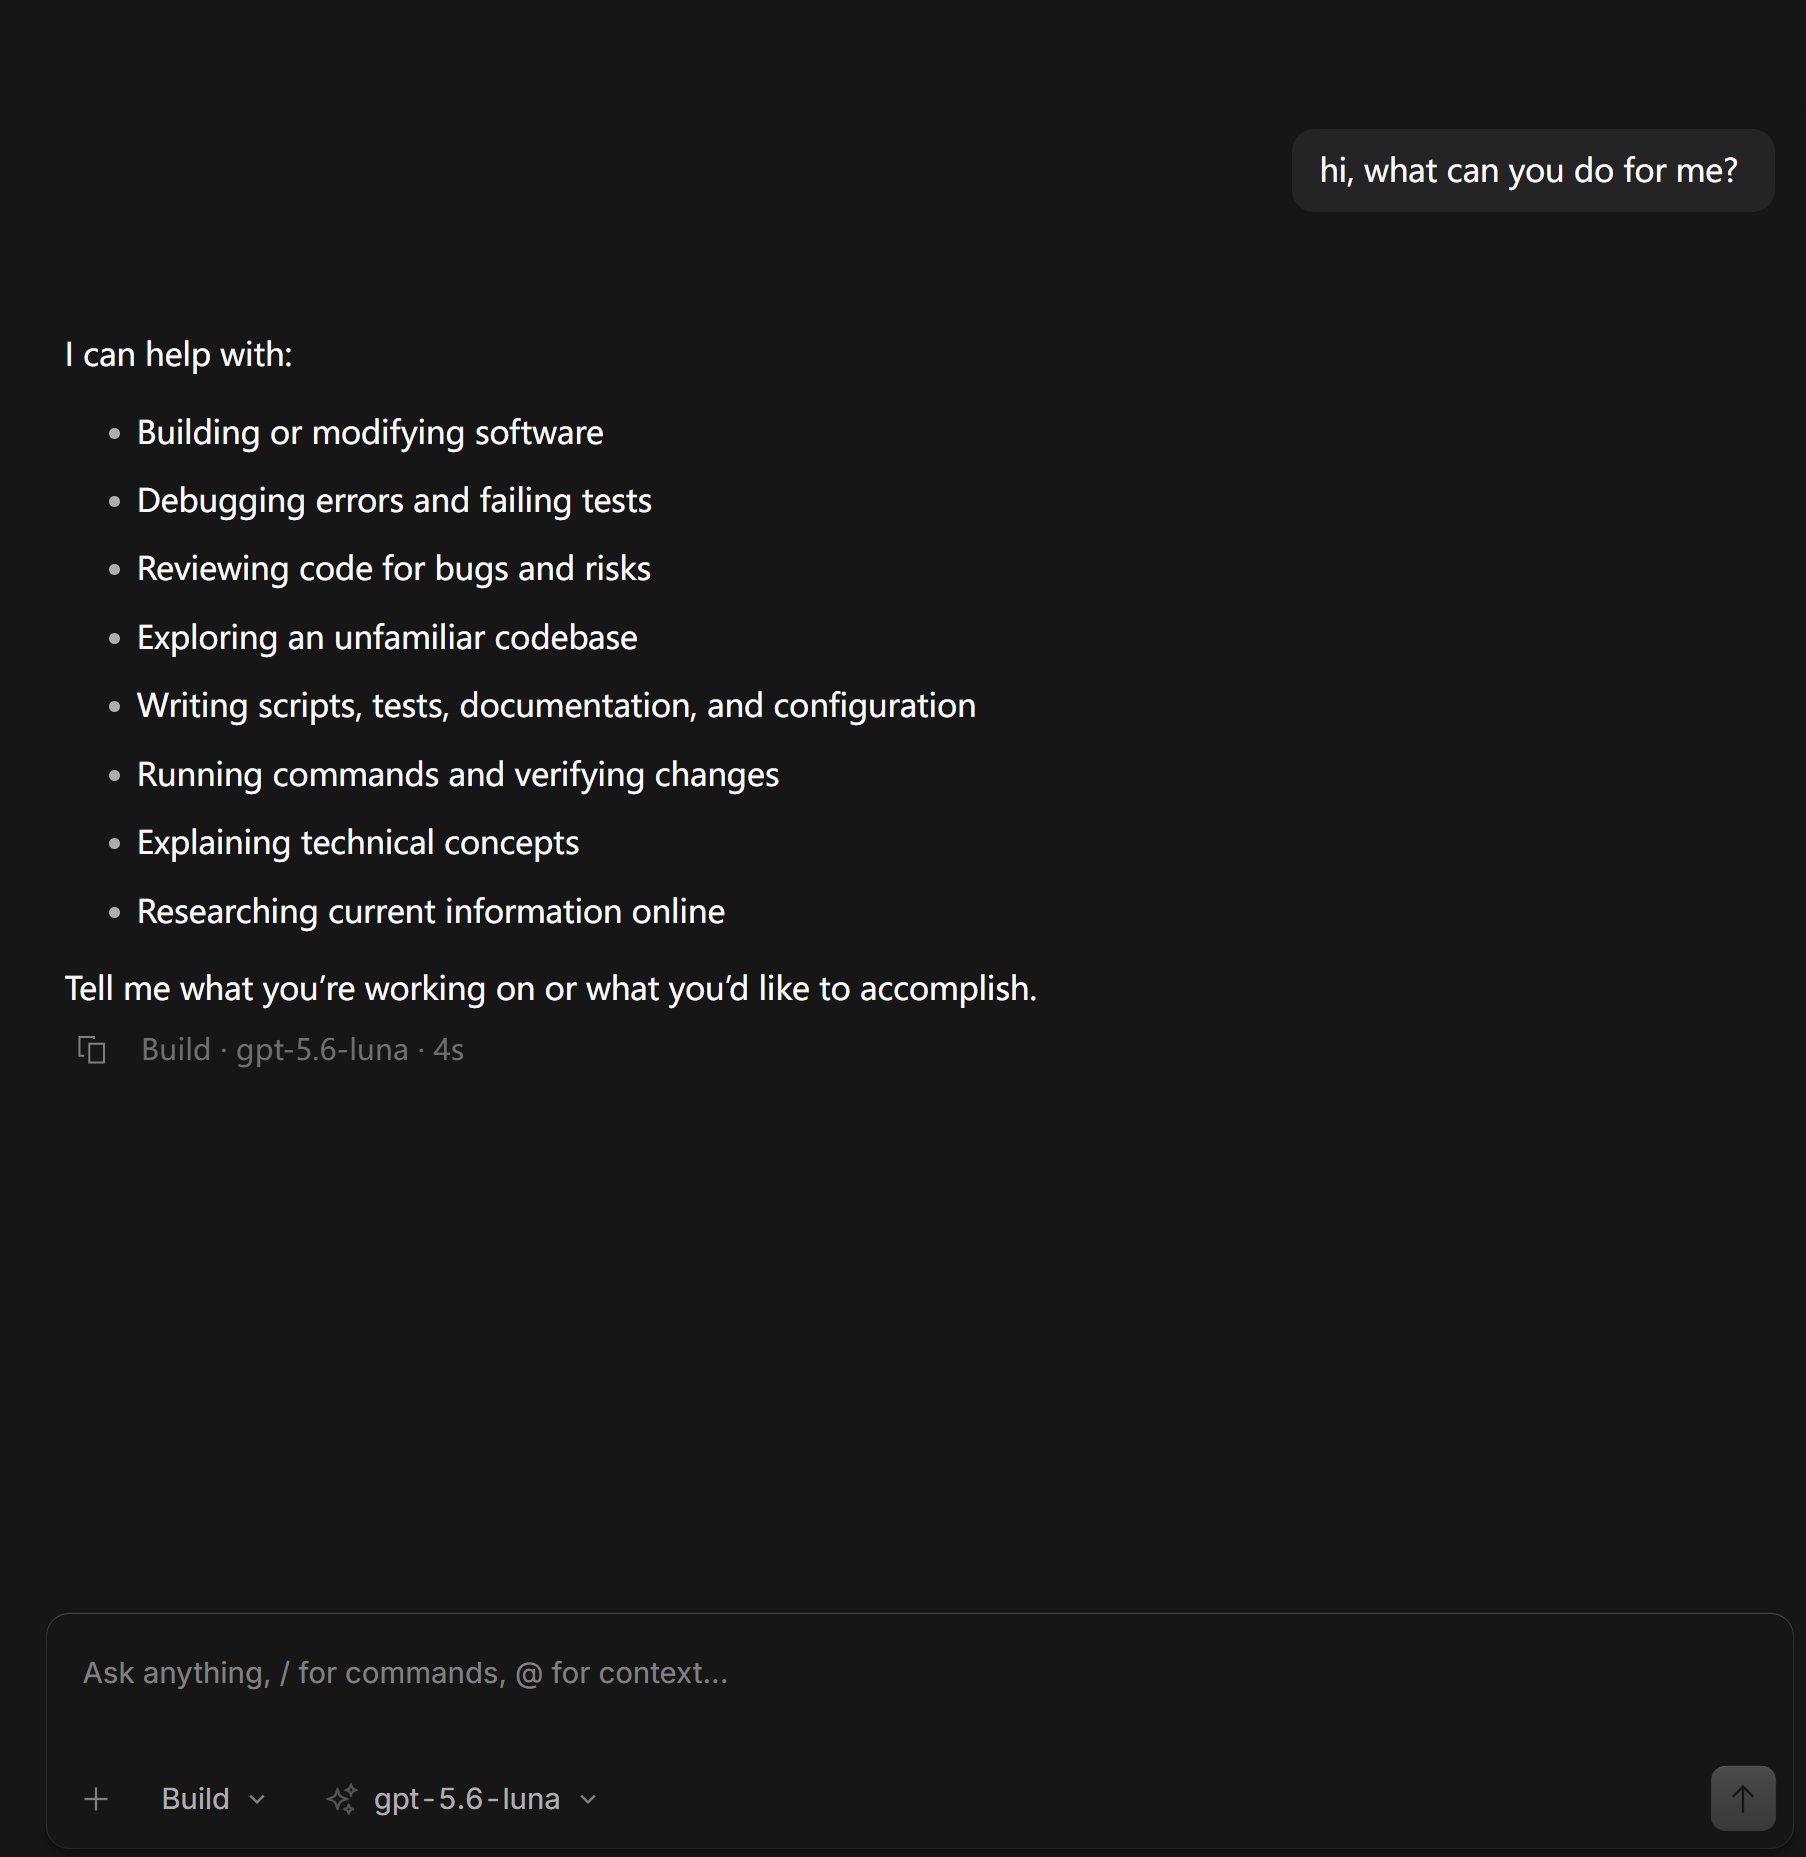
## 四、配置成功示例
下图为使用 MixRoute 在 OpenCode 中正常对话的示例:
保存后,在模型选择中使用 **提供商ID/模型ID**(如 `mixroute/gpt-5.5`)
**具体配置信息**:
| 配置项 | 值 |
| - | - |
| 基础 URL | `https://api.mixroute.ai/v1` |
| API 密钥 | 在控制台获取(格式如 `sk-xxxxxxxxxxxxx`) |
| 模型 | 从模型列表选择并填入模型 ID |
### 3. 切换模型
在对话或设置中选择已配置的提供商与模型(如 `mixroute/gpt-5.5`)即可切换。
* 若使用自建或备用服务,将 **基础 URL** 改为对应地址,例如 `http://your-server:3003/v1`。
* 默认模型可在项目或全局 `opencode.json` 中设置 `"model": "mixroute/模型ID"`。
## 三、部分模型需使用 Responses API(重要)
部分模型的访问接口与常规 Chat Completions 不同,需使用 **Responses API**。若在 OpenCode 中选用这类模型时出现类似错误:
> The chatCompletion operation does not work with the specified model, **gpt-5.1-codex**. Please choose different model and try again.
说明当前请求走了 **Chat Completions**,而该模型在服务端只开放 **Responses API**,需通过配置改为使用正确接口。
### 3.1 需要走 Responses API 的模型(典型)
| 模型 ID / 系列 | 说明 |
| - | - |
| **gpt-5.1-codex** | GPT 5.1 Codex,编程/代码场景,仅支持 Responses API |
| **gpt-5.2-codex** | GPT 5.2 Codex,同上 |
| **gpt-5.3-codex** | GPT 5.2 Codex,同上 |
### 3.2 在 OpenCode 中如何配置
通过**在配置文件中配置额外的供应商使用 @ai-sdk/openai**,即可让 OpenCode 对该模型使用 **Responses API**。
**1. 找到配置文件**
* **Windows**:`C:\Users\<用户名>\.config\opencode\opencode.jsonc`
* **macOS / Linux**:`~/.config/opencode/opencode.jsonc`
**2. 在自定义提供商的模型配置中添加参数**
对需要走 Responses API 的模型做如下配置:
```jsonc theme={null}
{
"$schema": "https://opencode.ai/config.json",
"disabled_providers": [],
"provider": {
"mixroute": {
"name": "mixroute",
"npm": "@ai-sdk/openai-compatible",
"options": {
"baseURL": "https://api.mixroute.ai/v1"
},
"models": {
"gemini-3.8-flash": {
"name": "gemini-3.8-flash"
}
}
},
"mixroute-responses": {
"name": "mixroute-responses",
"npm": "@ai-sdk/openai",
"options": {
"baseURL": "https://api.mixroute.ai/v1",
"apiKey": "mixroute-key"
},
"models": {
"gpt-5.6-luna": {
"name": "gpt-5.6-luna"
},
"gpt-5.6-terra": {
"name": "gpt-5.6-terra"
},
"gpt-5.6-sol": {
"name": "gpt-5.6-sol"
}
}
}
}
}
```
保存后,在 OpenCode 中选择该提供商下的模型 (如 `mixroute/gpt-5.6-luna`),请求会以 **Responses API** 格式发往该 baseURL。
### 3.3 小结
| 场景 | 做法 |
| - | - |
| 使用 **gpt-5.1-codex / gpt-5.2-codex** 等仅支持 Responses 的模型 | 在 `opencode.jsonc` 中,添加独立的供应商以通过Responses的方式访问 |
| 使用 **gpt-5.5、claude-opus-4-8** 等常规模型 | 无需修改,按上文「快速配置」使用即可 |
## 四、配置成功示例
下图为使用 MixRoute 在 OpenCode 中正常对话的示例:
 ## 五、参考链接
* OpenCode 官网与下载:[https://opencode.ai/](https://opencode.ai/)
* OpenCode 配置与模型说明:[Models](https://opencode.ai/docs/models)、[Providers](https://opencode.ai/docs/providers)
This documentation is built and hosted on [Mintlify](https://mintlify.com), a developer documentation platform.
## 五、参考链接
* OpenCode 官网与下载:[https://opencode.ai/](https://opencode.ai/)
* OpenCode 配置与模型说明:[Models](https://opencode.ai/docs/models)、[Providers](https://opencode.ai/docs/providers)
This documentation is built and hosted on [Mintlify](https://mintlify.com), a developer documentation platform.