> ## Documentation Index
> Fetch the complete documentation index at: https://docs.mixroute.ai/llms.txt
> Use this file to discover all available pages before exploring further.
# OpenCode
> OpenCode連携ガイド:MixRoute経由で利用するマルチモデルのプログラミングアシスタント。
## はじめに
OpenCodeは、75以上のモデルとローカルデプロイに対応するオープンソースのAIプログラミングアシスタントです。**MixRoute API**を使うと、プロバイダーとモデルを独自に設定して、さまざまな主要モデルや最新モデル(GPT、Claude、Geminiなど)をOpenCodeで利用できます。
**ダウンロード**:[https://opencode.ai/](https://opencode.ai/)
## クイック設定
### 1. APIキーを取得
[MixRouteコンソール](https://api.mixroute.ai/)でAPIキーを作成し、コピーしてください。
### 2. OpenCodeでカスタムプロバイダーを設定する
OpenCodeを開き、**サーバー / プロバイダー**の設定に移動します
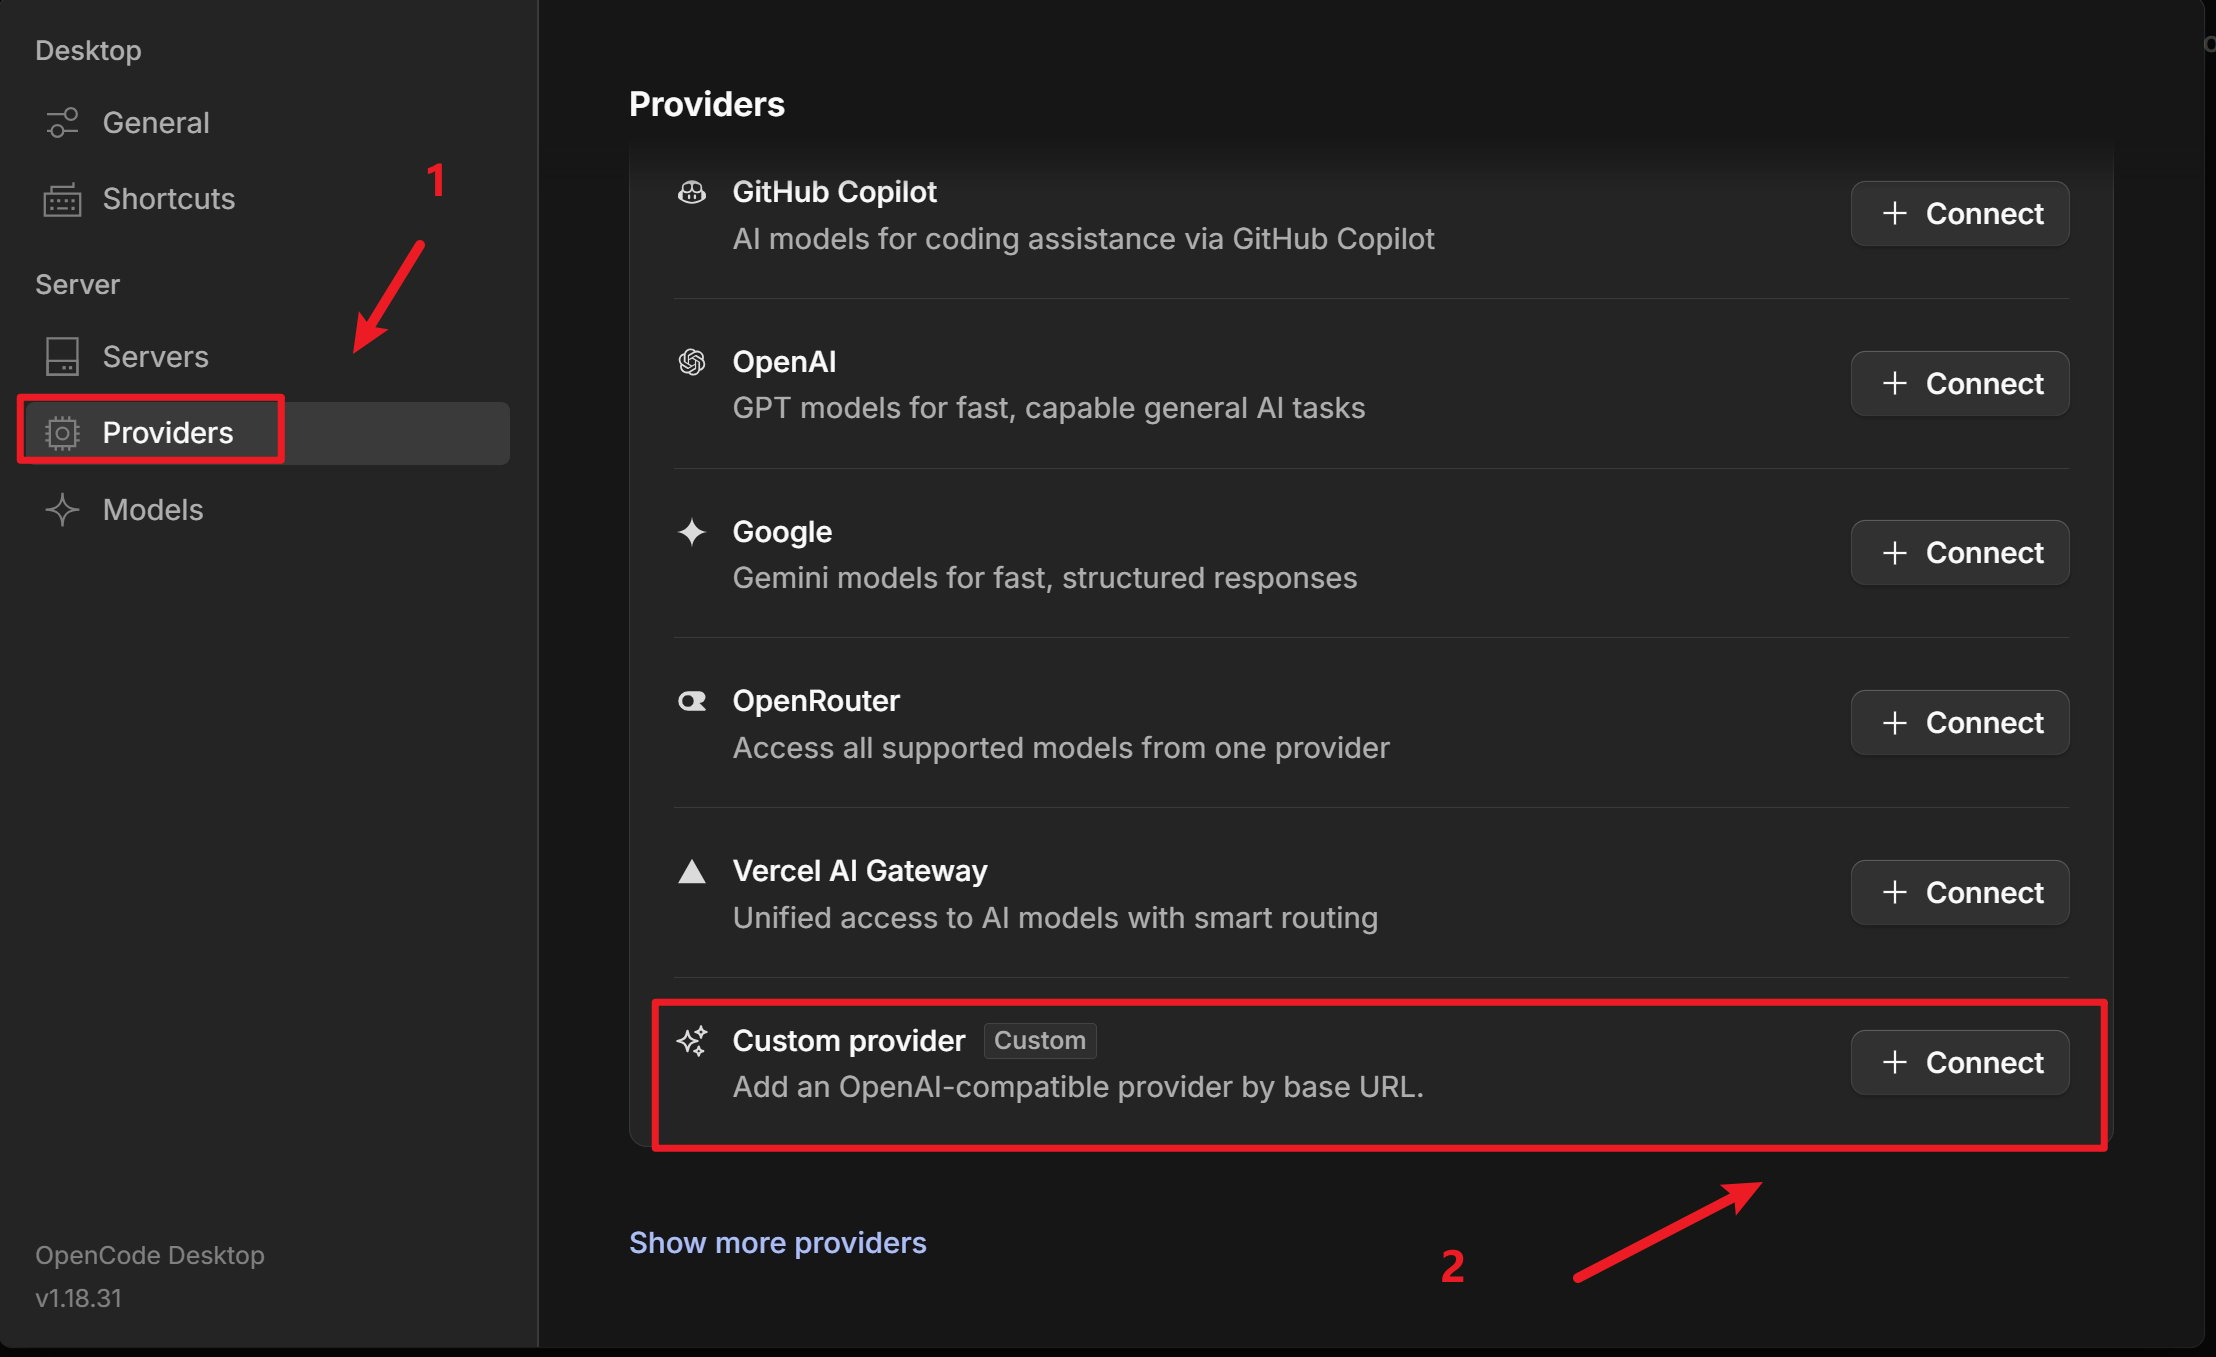
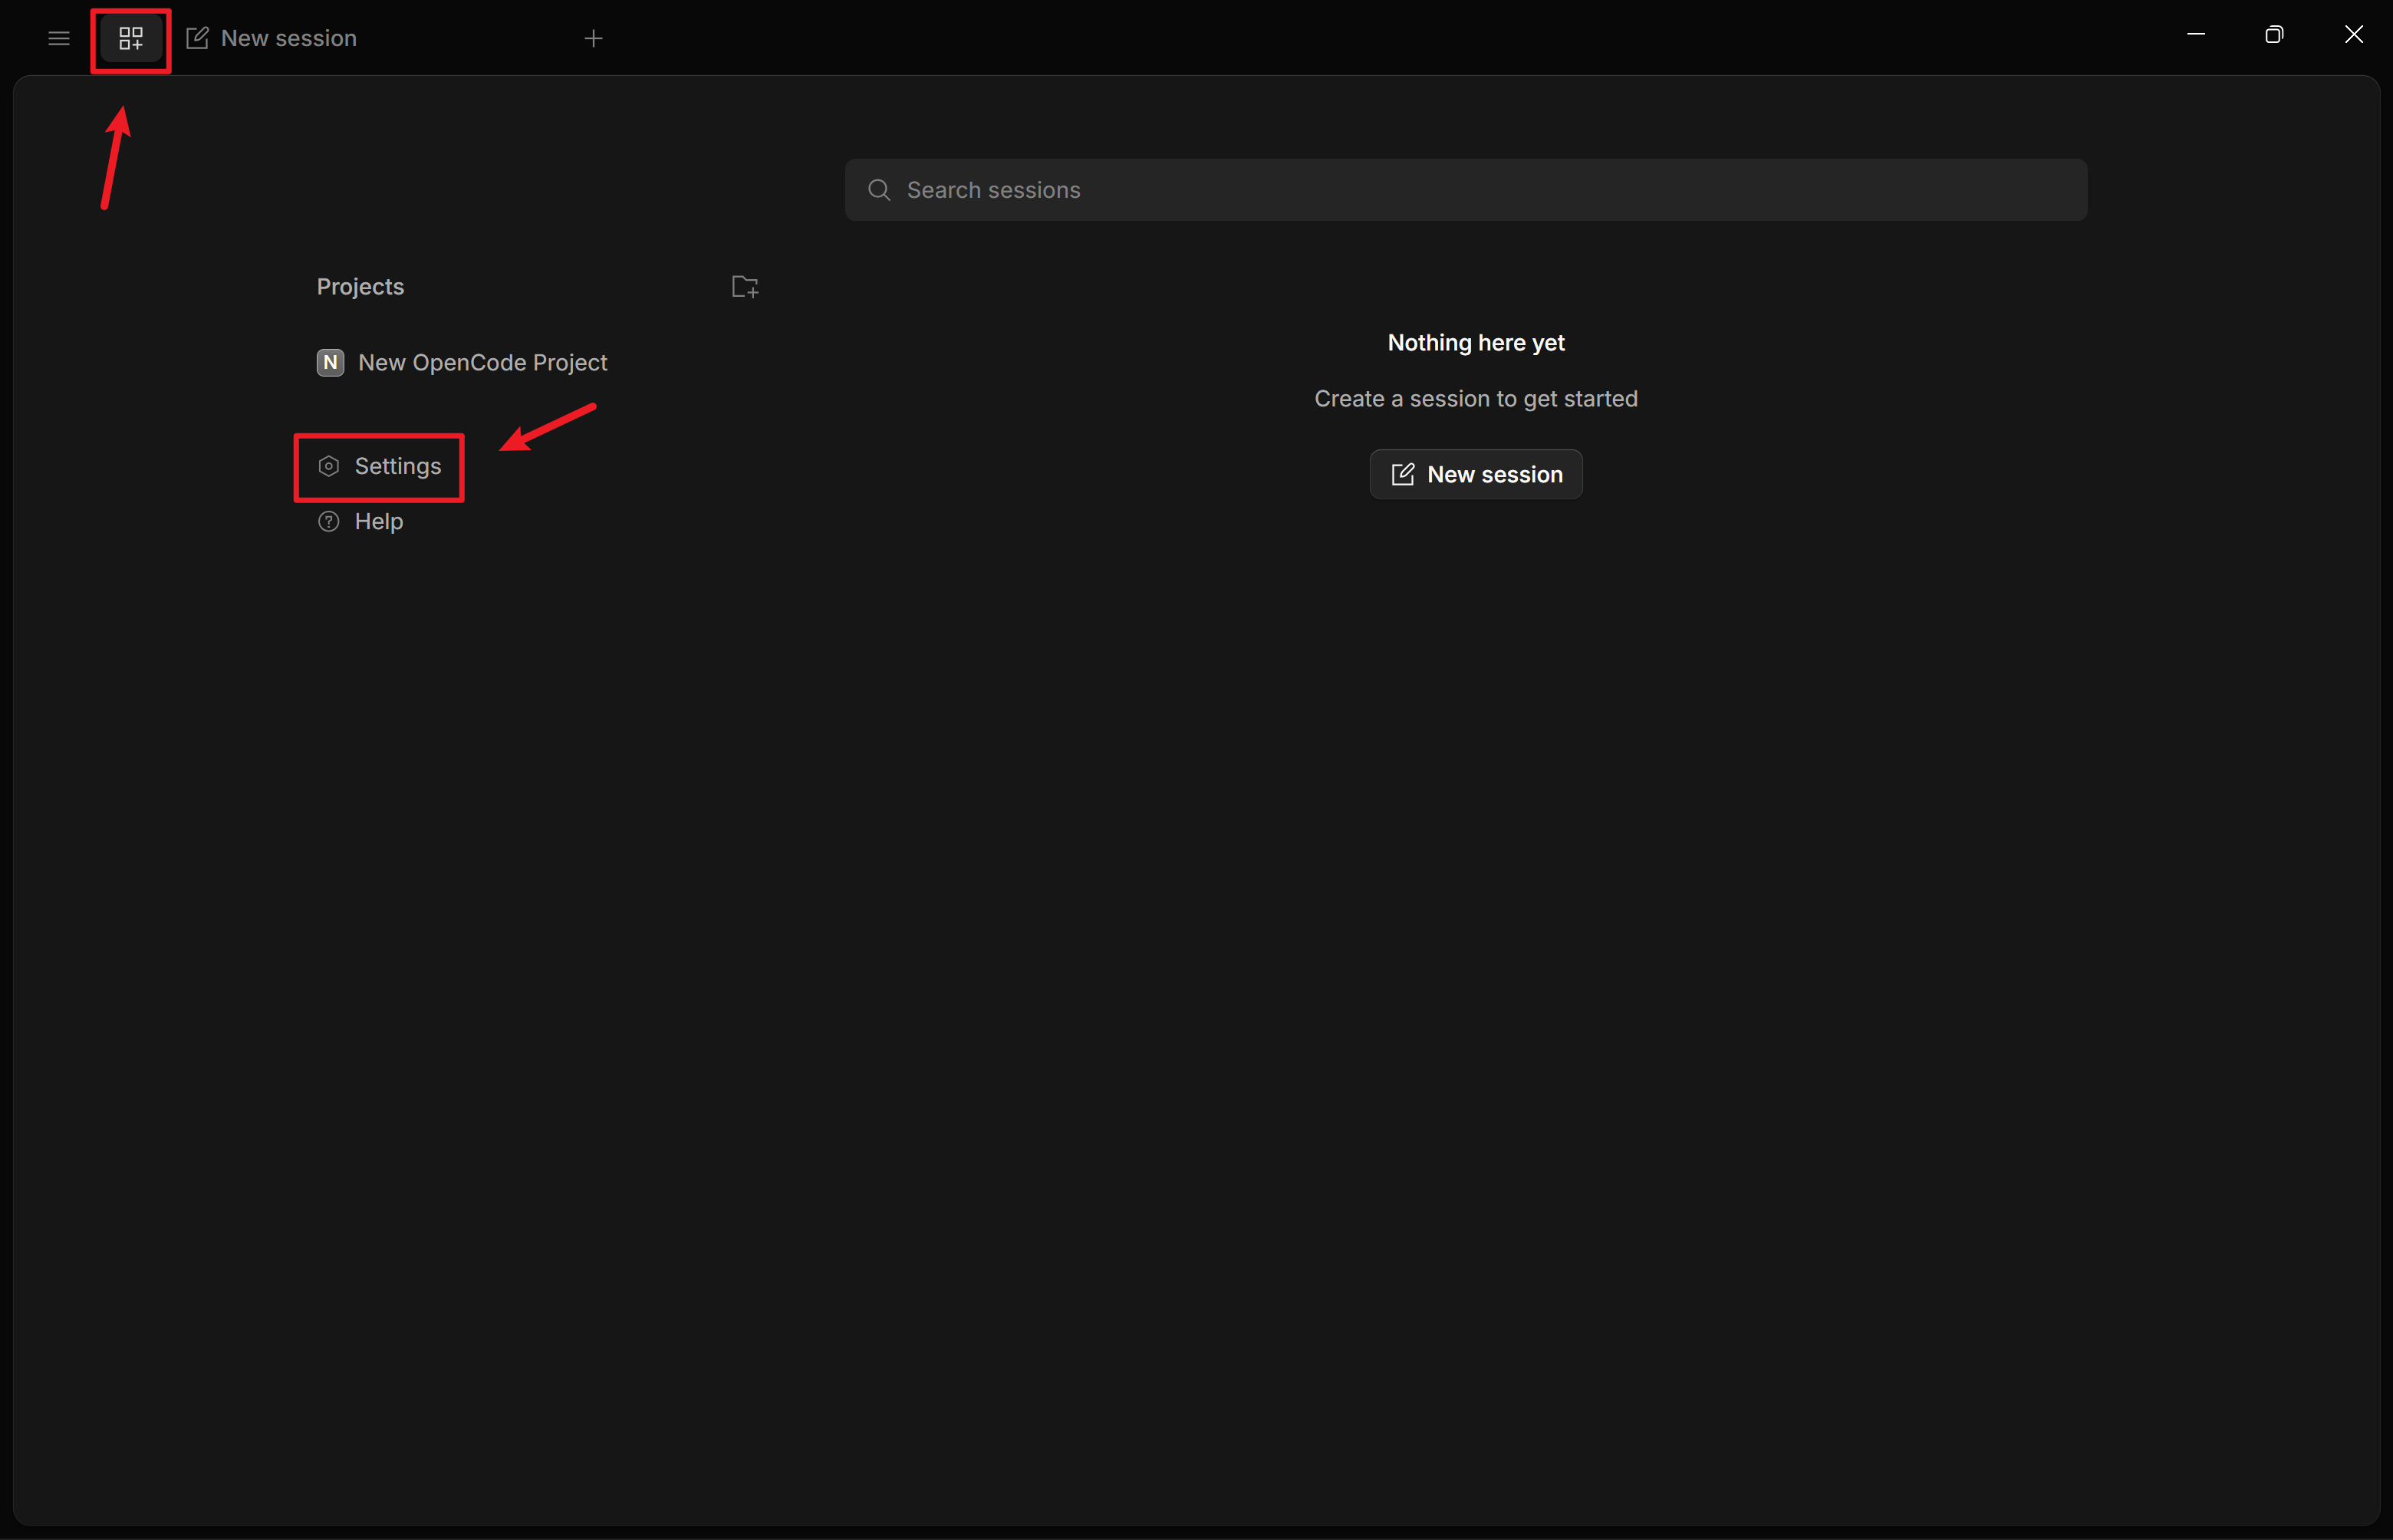 **カスタムプロバイダー**を追加(OpenAI互換プロバイダーを設定)
 [スマートルーティング](https://console.mixroute.ai/smart-route)は、タスクの複雑さに基づいてリクエストを最適なモデルに自動的に振り分け、効率を高めながらAPIコストを削減するインテリジェントなモデルルーティング機能です。
制約と利用ガイドについては、[こちら](/ja/api-reference/smart-routing)を参照してください。
* **プロバイダーID**:例:`mixroute-route`(小文字、数字、ハイフン、アンダースコア)
* **表示名**: 例: `Mixroute Api Route`
* **ベースURL**:`https://api.mixroute.ai/v1`(末尾は`/v1`である必要があります)
* **APIキー**: Mixroute APIのスマートルーティングノードのキーを貼り付けます
スマートルーティングのノードキーは独立しており、従来のAPIキーとは共有されないことに注意してください。
* **プロバイダーID**:例:`mixroute`(小文字、数字、ハイフン、アンダースコア)
* **表示名**: 例: `Mixroute Api`
* **ベースURL**:`https://api.mixroute.ai/v1`(末尾は`/v1`である必要があります)
* **APIキー**: Mixroute APIキーを貼り付けます
必要なモデルを追加してください(例: `gpt-5.5`、`claude-opus-4-8`)
[スマートルーティング](https://console.mixroute.ai/smart-route)は、タスクの複雑さに基づいてリクエストを最適なモデルに自動的に振り分け、効率を高めながらAPIコストを削減するインテリジェントなモデルルーティング機能です。
制約と利用ガイドについては、[こちら](/ja/api-reference/smart-routing)を参照してください。
* **プロバイダーID**:例:`mixroute-route`(小文字、数字、ハイフン、アンダースコア)
* **表示名**: 例: `Mixroute Api Route`
* **ベースURL**:`https://api.mixroute.ai/v1`(末尾は`/v1`である必要があります)
* **APIキー**: Mixroute APIのスマートルーティングノードのキーを貼り付けます
スマートルーティングのノードキーは独立しており、従来のAPIキーとは共有されないことに注意してください。
* **プロバイダーID**:例:`mixroute`(小文字、数字、ハイフン、アンダースコア)
* **表示名**: 例: `Mixroute Api`
* **ベースURL**:`https://api.mixroute.ai/v1`(末尾は`/v1`である必要があります)
* **APIキー**: Mixroute APIキーを貼り付けます
必要なモデルを追加してください(例: `gpt-5.5`、`claude-opus-4-8`)
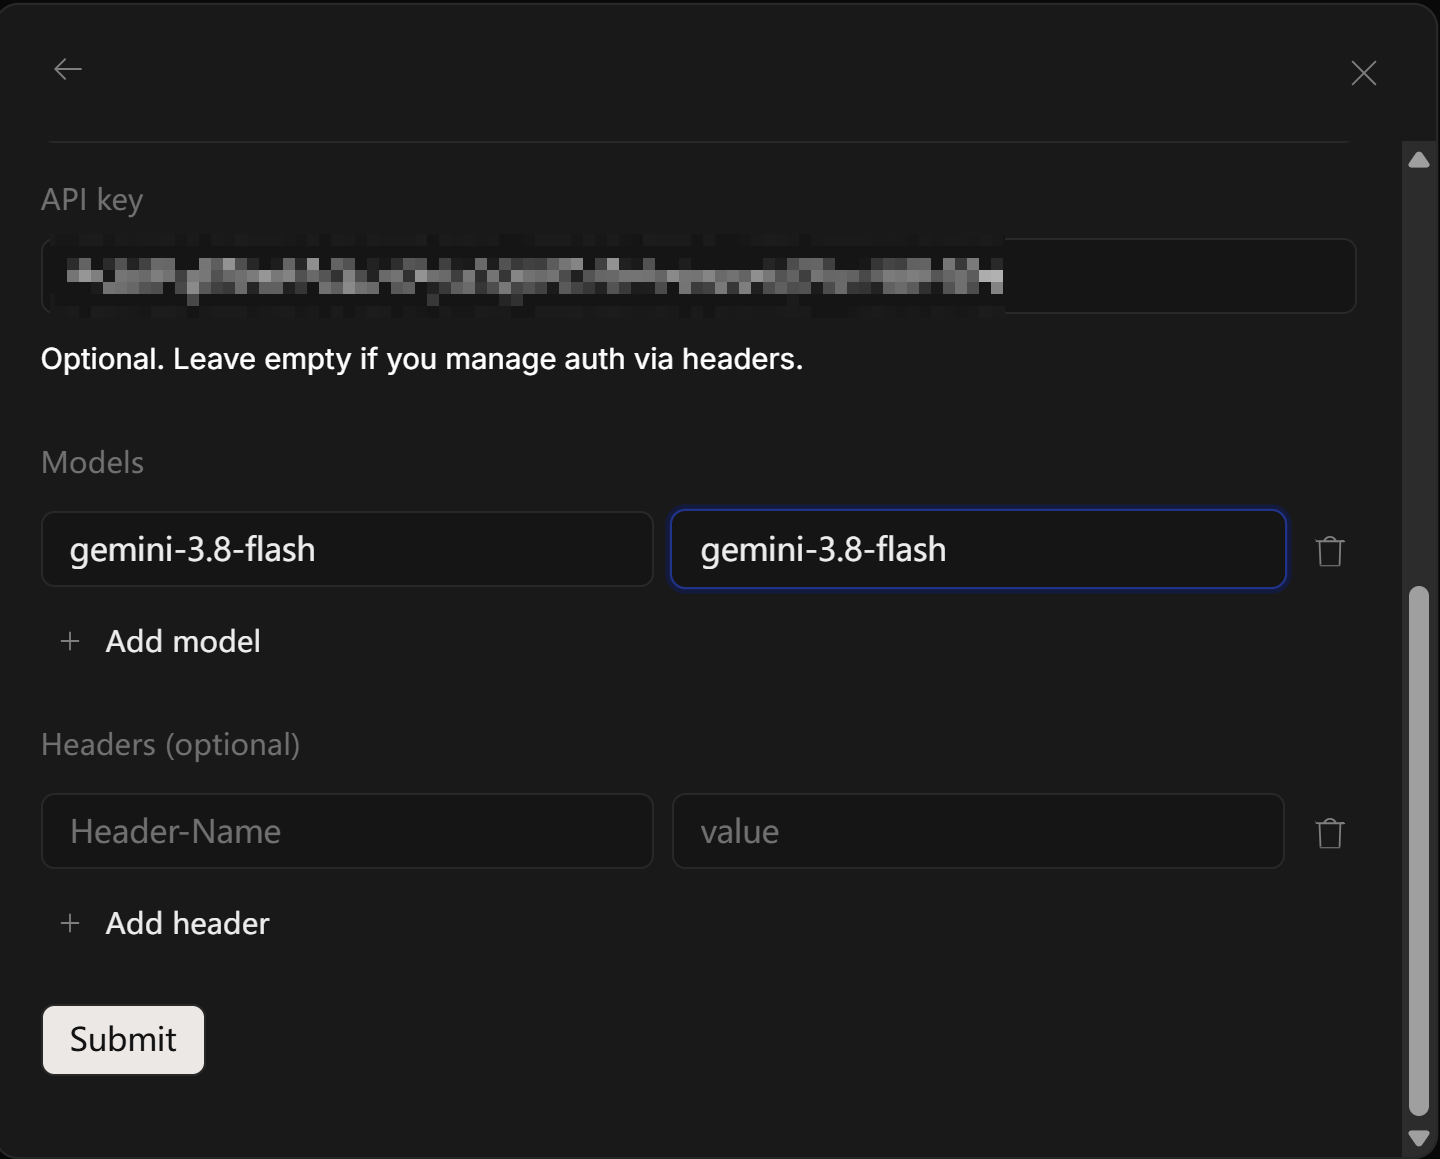 **ProviderID/ModelID**形式(例:`mixroute/gpt-5.5`)を使用します。
### 3. モデルの切り替え
チャットまたは設定で、設定済みのプロバイダーとモデル(例:`mixroute/gpt-5.5`)を選択します。
## Responses APIが必要なモデル
一部のモデルには、Chat Completionsではなく**Responses API**が必要です。次のエラーが表示された場合:
> The chatCompletion operation does not work with the specified model
Responsesを使用するために追加のプロバイダーを登録します。
```jsonc theme={null}
{
"$schema": "https://opencode.ai/config.json",
"disabled_providers": [],
"provider": {
"mixroute": {
"name": "mixroute",
"npm": "@ai-sdk/openai-compatible",
"options": {
"baseURL": "https://api.mixroute.ai/v1"
},
"models": {
"gemini-3.8-flash": {
"name": "gemini-3.8-flash"
}
}
},
"mixroute-responses": {
"name": "mixroute-responses",
"npm": "@ai-sdk/openai",
"options": {
"baseURL": "https://api.mixroute.ai/v1",
"apiKey": "mixroute-key"
},
"models": {
"gpt-5.6-luna": {
"name": "gpt-5.6-luna"
},
"gpt-5.6-terra": {
"name": "gpt-5.6-terra"
},
"gpt-5.6-sol": {
"name": "gpt-5.6-sol"
}
}
}
}
}
```
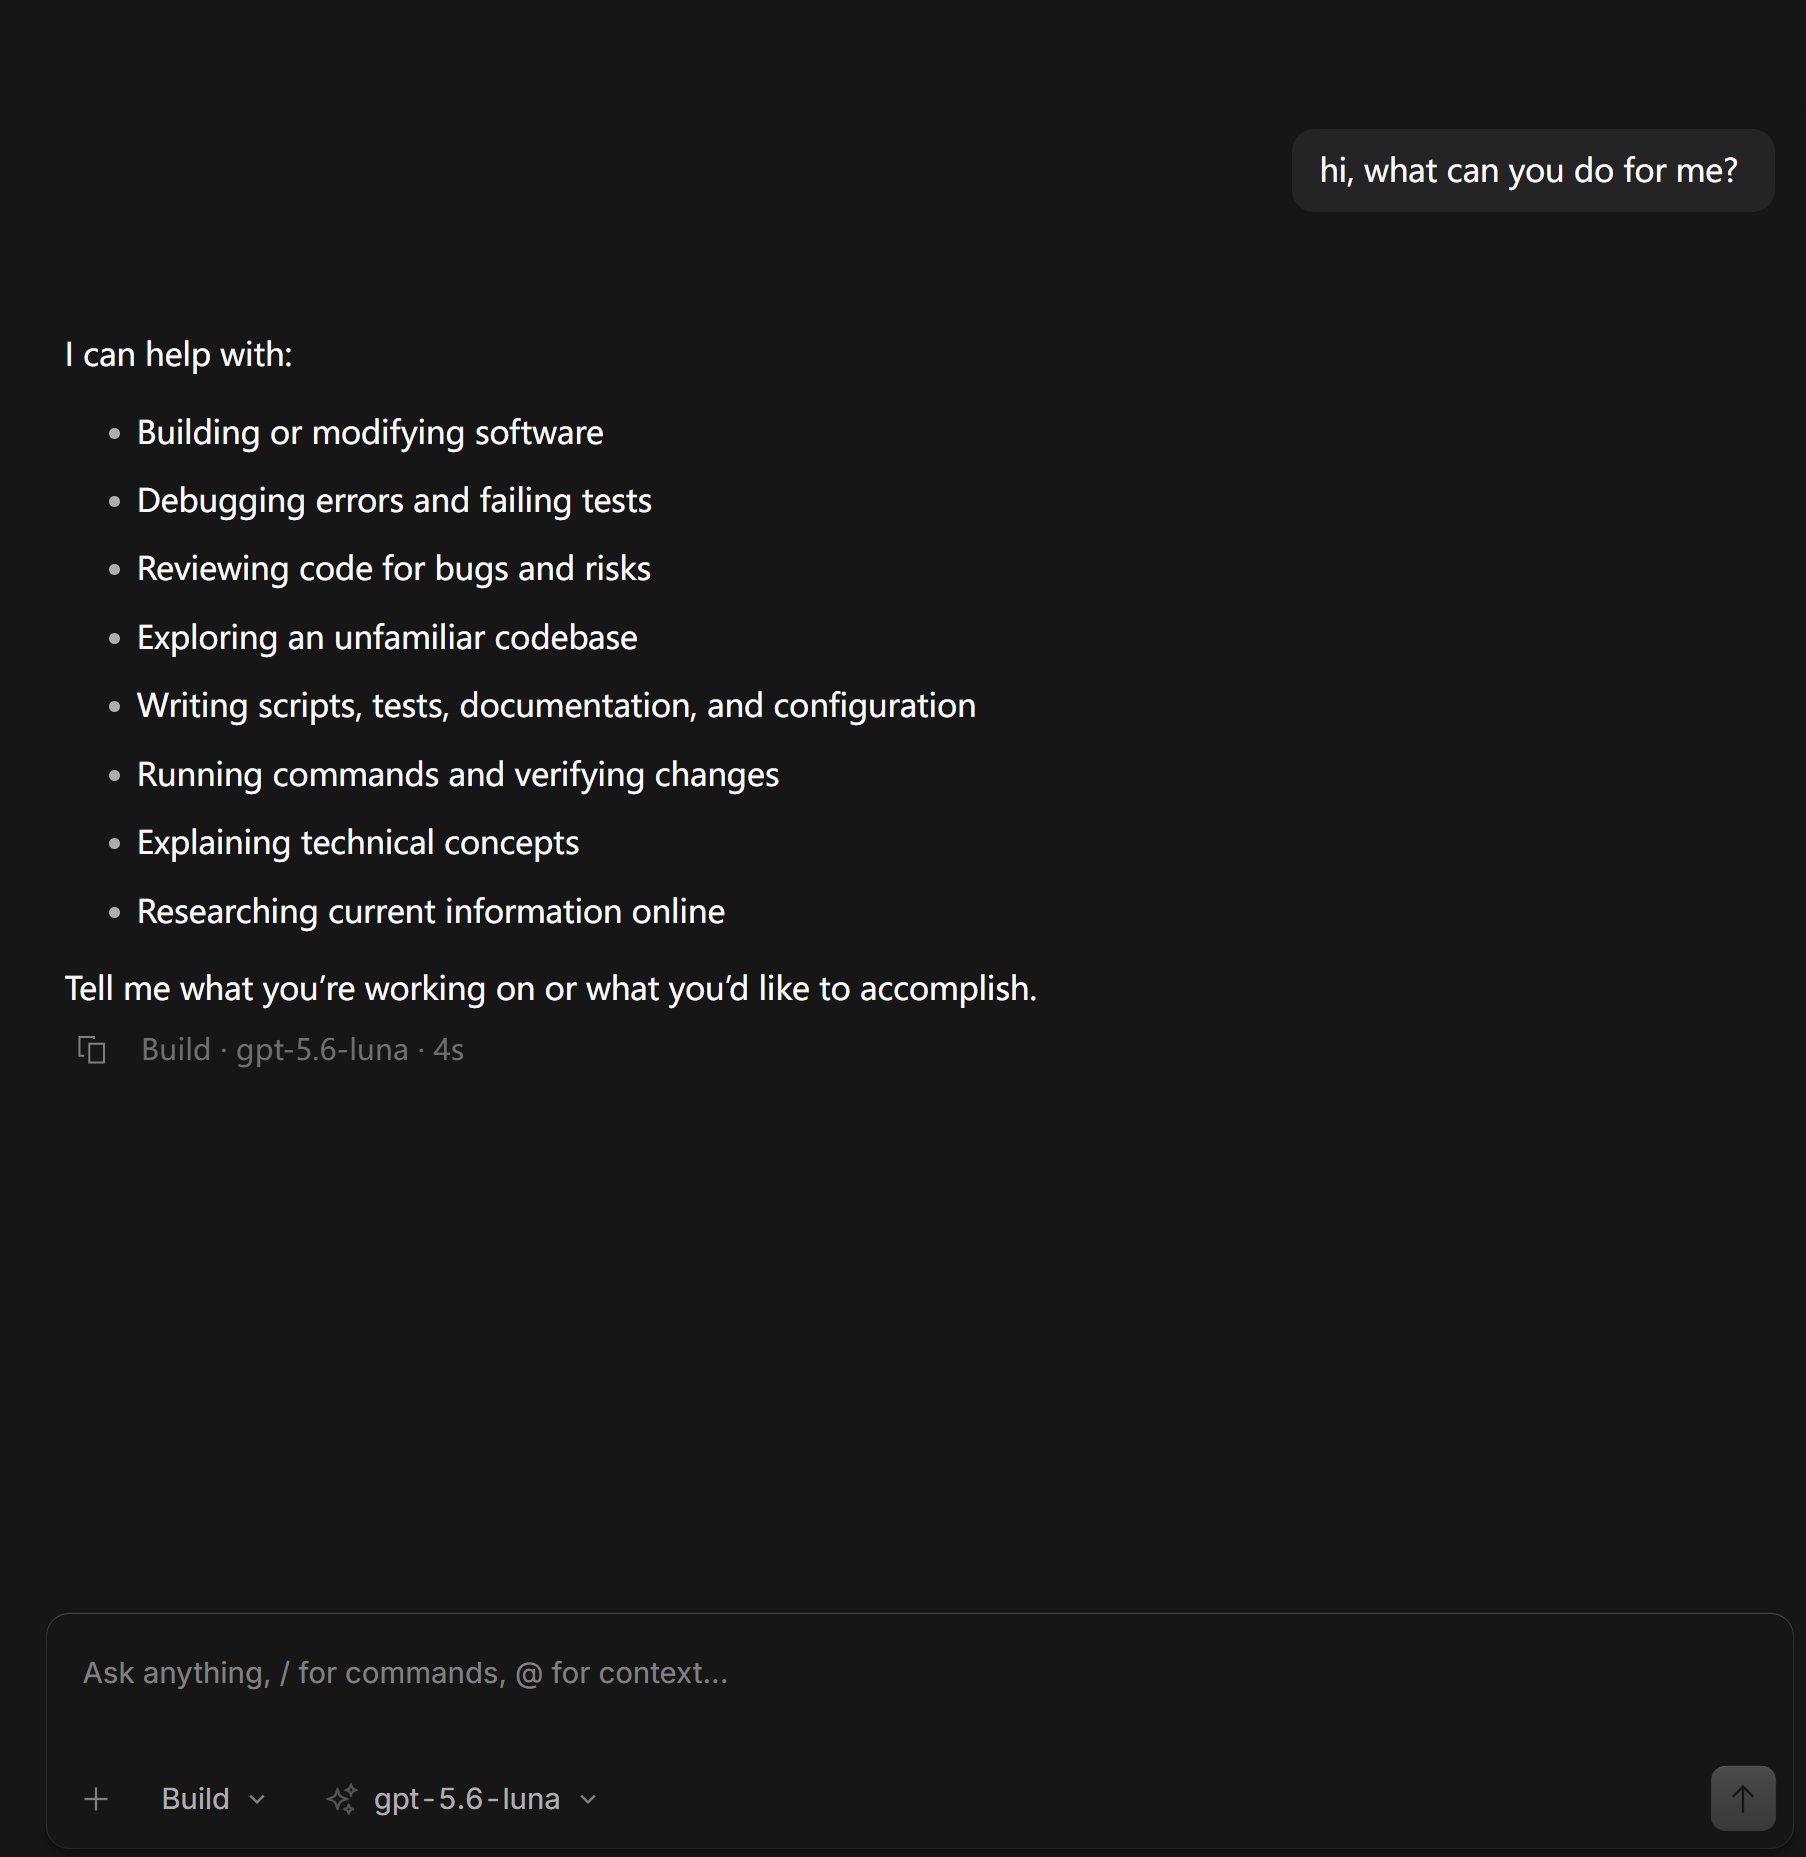
## 設定成功時の例
以下は、OpenCodeでMixroute APIを使用した通常の会話の例です。
**ProviderID/ModelID**形式(例:`mixroute/gpt-5.5`)を使用します。
### 3. モデルの切り替え
チャットまたは設定で、設定済みのプロバイダーとモデル(例:`mixroute/gpt-5.5`)を選択します。
## Responses APIが必要なモデル
一部のモデルには、Chat Completionsではなく**Responses API**が必要です。次のエラーが表示された場合:
> The chatCompletion operation does not work with the specified model
Responsesを使用するために追加のプロバイダーを登録します。
```jsonc theme={null}
{
"$schema": "https://opencode.ai/config.json",
"disabled_providers": [],
"provider": {
"mixroute": {
"name": "mixroute",
"npm": "@ai-sdk/openai-compatible",
"options": {
"baseURL": "https://api.mixroute.ai/v1"
},
"models": {
"gemini-3.8-flash": {
"name": "gemini-3.8-flash"
}
}
},
"mixroute-responses": {
"name": "mixroute-responses",
"npm": "@ai-sdk/openai",
"options": {
"baseURL": "https://api.mixroute.ai/v1",
"apiKey": "mixroute-key"
},
"models": {
"gpt-5.6-luna": {
"name": "gpt-5.6-luna"
},
"gpt-5.6-terra": {
"name": "gpt-5.6-terra"
},
"gpt-5.6-sol": {
"name": "gpt-5.6-sol"
}
}
}
}
}
```
## 設定成功時の例
以下は、OpenCodeでMixroute APIを使用した通常の会話の例です。
 This documentation is built and hosted on [Mintlify](https://mintlify.com), a developer documentation platform.